# Add a Configuration Screen in App Builder
Entando 6 widgets can be customized through an App Builder configuration screen so the citizen developers can avoid writing ad-hoc additional code.
In Entando 6, the configuration screen is also a micro frontend, which can also be defined as a web component. That means you can develop and test it in isolation, without a running Entando instance.
# Create React App
Let’s start with the boilerplate provided by Create React App (opens new window), probably the most popular one.
npx create-react-app my-widget-config --use-npm
my-widget-config
├── README.md
├── node_modules
├── package.json
├── .gitignore
├── public
│   ├── favicon.ico
│   ├── index.html
│   ├── logo192.png
│   ├── logo512.png
│   ├── manifest.json
│   └── robots.txt
└── src
    ├── App.css
    ├── App.js
    ├── App.test.js
    ├── index.css
    ├── index.js
    ├── logo.svg
    ├── serviceWorker.js
    └── setupTests.js
Then, type cd my-widget-config and npm start to start the app.
# Add Input Field
Let’s start with a simple form: only an input with a label. So, let’s
edit App.js
import React from 'react';

class App extends React.Component {
  constructor(props) {
    super(props);
    this.state = { name: ''};
  }

  handleNameChange(value) {
    this.setState(prevState => ({
      ...prevState,
      name: value,
    }));
  }

  render() {
    const { name } = this.state;
    return (
      <div>
        <h1>Sample Entando 6 Widget Configuration</h1>
        <label htmlFor="name">Name</label>
        <input id="name" onChange={e => this.handleNameChange(e.target.value)} value={name} />
      </div>
    );
  }
}

export default App;
You are free to use your favorite form handling library e.g., Formik (opens new window), redux-form (opens new window) (that requirese redux) or others.
In regards to styling, since this is going to be an App Builder screen,
we strongly suggest using PatternFly
v3 (opens new window) (patternfly and patternfly-react
packages) to keep UX coherence.
# Custom Element
Now, let’s add the web component that will wrap the entire React app.
Let’s name it WidgetElement
import React from 'react';
import ReactDOM from 'react-dom';
import App from './App';

class WidgetElement extends HTMLElement {
  constructor() {
    super();
    this.reactRootRef = React.createRef();
    this.mountPoint = null;
  }

  get config() {
    return this.reactRootRef.current ? this.reactRootRef.current.state : {};
  }

  set config(value) {
    return this.reactRootRef.current.setState(value);
  }

  connectedCallback() {
    this.mountPoint = document.createElement('div');
    this.appendChild(this.mountPoint);
    ReactDOM.render(<App ref={this.reactRootRef} />, this.mountPoint);
  }
}

customElements.define('my-widget-config', WidgetElement);

export default WidgetElement;
Its responsibility is rendering the react app and syncing the react app
state in a config property, that must be named that way. The key to
App builder communication is that it works in three steps:
App Builder reads
configproperty when the widget config screen is renderedconfigproperty is mutated when a user configures the widgetWhen a user saves the config, App Builder retrieves it (again, from the
configproperty) and persists it through Entando APIs
This means the widget developer can focus on the configuration screens without having to call Entando APIs to read or write configuration.
One more JS file to update: index.js. Starting from this
import React from 'react';
import ReactDOM from 'react-dom';
import './index.css';
import App from './App';
import * as serviceWorker from './serviceWorker';

ReactDOM.render(<App />, document.getElementById('root'));

// If you want your app to work offline and load faster, you can change
// unregister() to register() below. Note this comes with some pitfalls.
// Learn more about service workers: https://bit.ly/CRA-PWA
serviceWorker.unregister();
You only have to import WidgetElement plus the css, if needed.
Something like
import './index.css';
import './WidgetElement';
We assume we don’t need a service worker for the widget, so we can delete serviceWorker.js.
To ensure our web component is working we have to edit
public/index.html. Remove <div id="root"></div> from the body (we
programmatically generated the react root in the connectedCallback
method of WidgetElement) and add our new web component tag
<my-widget />.
<!DOCTYPE html>
<html lang="en">
  <head>
    <meta charset="utf-8" />
    <link rel="shortcut icon" href="%PUBLIC_URL%/favicon.ico" />
    <meta name="viewport" content="width=device-width, initial-scale=1" />
    <title>React App</title>
  </head>
  <body>
    <my-widget-config />
  </body>
</html>
Note
the web component tag name (
my-widget-configin this tutorial) must match the first parameter of thecustomElements.definemethod.
The page should auto reload and…congrats, you’re running an Entando 6 widget in isolation.
# Configuration Screen
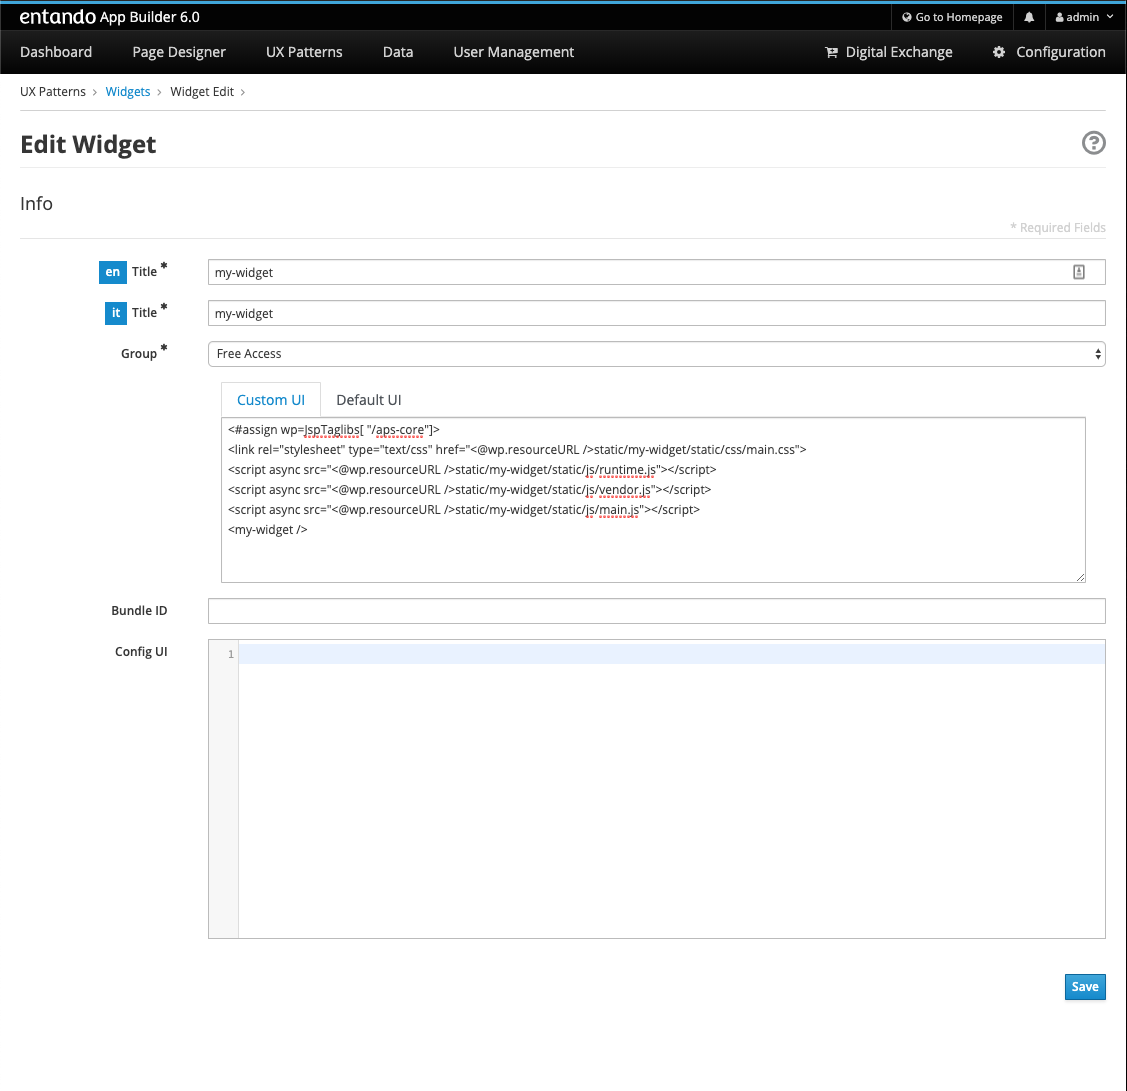
Before integrating the widget config screen, we need some widget info. Open App Builder, go to UX Patterns → Widgets and click on the installed widget that we’re creating the configuration screen for.
You’ll see a screen like:

Next, we’ll build our widget before embedding it into the Entando 6 instance. From the react project root, type
npm run build
and a build/static directory will be generated. Copy it into the
Entando 6 instance under
src\main\webapp\cmsresources\my-widget-config, then rename
a file like
js/runtime~main.c7dcdf0b.jstojs/runtime.js(bootstrapping logic)a file like
js/2.230b21ef.chunk.jstojs/vendor.js(third-party libraries)a file like
js/main.1fd3965a.chunk.jstojs/main.js(app)
Now, edit again the widget and update the configUI field.
{
  "customElement": "my-widget-config",
  "resources": [
    "my-widget-config/static/js/runtime.js",
    "my-widget-config/static/js/vendor.js",
    "my-widget-config/static/js/main.js"
  ]
}
Note
It is possible to keep the original names in order to avoid potential caching issues, but then you will have to update the Config UI field in the App Builder widget screen each time a new version of the widget is deployed.
configUIis a JSON object, so pay attention to save a well-formed one (the integrated JSON editor will help you)value for
customElementmust match the name of custom tag inindex.htmland the one passed as parameter tocustomElements.defineinWidgetElement
Last step: configure a page in App Builder, drag our widget into the page model slot and you’ll see the configuration screen we just built.
# Display Widget Configuration
So, we already created a react micro frontend widget and configuration screen to customize a name field.
In this tutorial we will display that field in our micro frontend widget.
# Add Attribute
Edit WidgetElement to add attribute handling to the custom element,
and make re-render our app when an attribute changes. Now, the name
attribute is being read from the custom element and passed as a prop to
the react root component (App).
import React from 'react';
import ReactDOM from 'react-dom';
import App from './App';

const ATTRIBUTES = {
  name: 'name',
};

class WidgetElement extends HTMLElement {

  static get observedAttributes() {
    return Object.values(ATTRIBUTES);
  }

  attributeChangedCallback(name, oldValue, newValue) {
    if (!Object.values(ATTRIBUTES).includes(name)) {
      throw new Error(`Untracked changed attribute: ${name}`);
    }
    if (this.mountPoint && newValue !== oldValue) {
      this.render();
    }
  }

  connectedCallback() {
    this.mountPoint = document.createElement('div');
    this.appendChild(this.mountPoint);
    this.render();
  }

  render() {
    const name = this.getAttribute(ATTRIBUTES.name);
    ReactDOM.render(<App name={name} />, this.mountPoint);
  }
}

customElements.define('my-widget', WidgetElement);

export default WidgetElement;
Note
attributeChangedCallbackis also a custom elements lifecycle hook method.
# Display Input
Edit the App component now, to make it display the name prop.
import React from 'react';
import './App.css';

function App({name}) {
  return (
    <div className="App">
      <header className="App-header">
        <p>
          Hello, {name}!
        </p>
      </header>
    </div>
  );
}

export default App;
Now, to ensure our custom element is working we can edit
public/index.html and set a value for the name attribute of the
custom element.
<!DOCTYPE html>
<html lang="en">
  <head>
    <meta charset="utf-8" />
    <link rel="shortcut icon" href="%PUBLIC_URL%/favicon.ico" />
    <meta name="viewport" content="width=device-width, initial-scale=1" />
    <title>React App</title>
  </head>
  <body>
    <my-widget name="Marco"/>
  </body>
</html>
After page reload, you should be able to display a simple "Hello, Marco!" message.
# Build It
From the react project root, type:
npm run build
and the build/static directory will be (re)generated. Copy it again
into the Entando 6 instance under
src\main\webapp\resources\static\my-widget, then rename
a file like
js/runtime~main.c7dcdf0b.jstojs/runtime.js(bootstrapping logic)a file like
js/2.230b21ef.chunk.jstojs/vendor.js(third-party libraries)a file like
js/main.1fd3965a.chunk.jstojs/main.js(app)a file like
css/main.d1b05096.chunk.jstocss/main.css(stylesheet)
Note
you could keep the original names in order to avoid potential caching issues, but then you will have to update the Custom UI field in the App Builder widget screen every time a new version of the widget is deployed.
If the application server you’re running does not have hot deploy enabled, restart it.
# Update Widget in App Builder
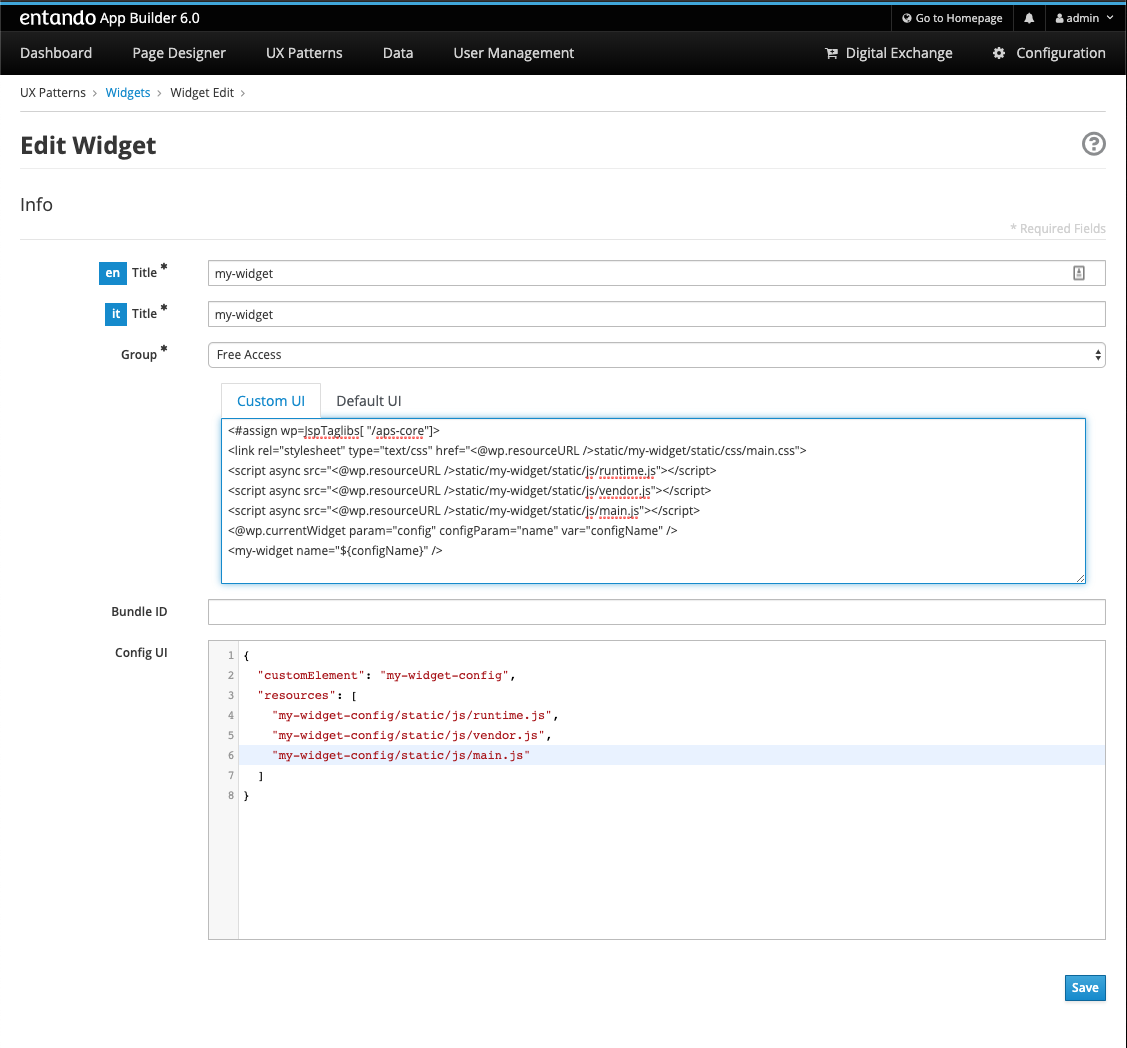
Open the Entando App Builder, go to UX Patterns → Widgets, find the widget My Widget and click to edit it.
You’ll see a screen like this one

Update the Custom UI field from:
<#assign wp=JspTaglibs[ "/aps-core"]>
<link rel="stylesheet" type="text/css" href="<@wp.resourceURL />static/my-widget/static/css/main.css">
<script async src="<@wp.resourceURL />static/my-widget/static/js/runtime.js"></script>
<script async src="<@wp.resourceURL />static/my-widget/static/js/vendor.js"></script>
<script async src="<@wp.resourceURL />static/my-widget/static/js/main.js"></script>
<my-widget />
to
<#assign wp=JspTaglibs[ "/aps-core"]>
<link rel="stylesheet" type="text/css" href="<@wp.resourceURL />static/my-widget/static/css/main.css">
<script async src="<@wp.resourceURL />static/my-widget/static/js/runtime.js"></script>
<script async src="<@wp.resourceURL />static/my-widget/static/js/vendor.js"></script>
<script async src="<@wp.resourceURL />static/my-widget/static/js/main.js"></script>
<@wp.currentWidget param="config" configParam="name" var="configName" />
<my-widget name="${configName}" />
We basically added a JSTL tag to extract a field (under configParam)
from the config field of the current widget and put it in a configName
variable, that we pass to the custom element.
Save the widget and reload the page that contains the widget: you’ll see "Hello, Marco!" as expected.